Friday, September 25, 2015

Waste Not

There is a great deal of waste taking place in kitchens and groceries stores across this country.

Oh the horror! Especially for a foodie like me...

When we get produce from a grocery store, the produce is cleaned and tidied for the consumer so we don't always get the produce in its complete form--totally understandable. But I started thinking about Korean dishes that fellow blogger Maangchi shared with the world, and wondered: which tops are actually edible?

I grew carrots and beets in my backyard a couple years ago and observed that for a single root (what we generally consider the edible part of the plant) there is a lot of foliage going on, on top. Quick general science background in case you're not familiar with root/tuber plants: these plants produce lots of foliage during the growing season because the leaves are where food production takes place (plants grow their own food!) and as fall rolls around, they take all that food and store it in the root/tuber for the next season. Roots/tuber vegetables generally have more starch than their leafy or fruit/flower components.

The thing is, most people send the green (and red) tops of beets, carrots and radishes to their compost/garbage bins when in fact, they're tossing away an edible (unless you have allergies) leafy green! These young leafy greens are great additions to a salad with their peppery tasting leaves giving a little bit of pizzaz.

Photo credit: Todd & Diane

However, it is logical that it is off-putting when considering residual pesticides or other chemical additives that might linger so in that case, certainly toss it away. But if you have the chance to get organic or pesticide free leaves and tuber/roots, cut the leaves off when you get home and store each piece separately.

I didn't have the same patience to make the recipe that Maangchi posted but I decided to stir-fry it with garlic and salt....


Washing them in cold water to prep for cooking.
Don't forget to cut into halves of you'll just have one long leaf to eat!

  1. Clean up the leaves in cold water; halve the leaves so they're not one long piece to eat
  2. Shake off the excess water
  3. Mince garlic and set aside.
  4. Add some oil to a hot pan, waiting a minute for it to heat. You'll know it's hot enough when you tilt the pan around and the oil becomes more viscous.
  5. Added garlic to let that sizzle and cook a bit--careful not to let it burn so stir gently.
  6. Then drop in the green tops of radish and cook and stir/turn until wilted and dark green.
  7. If it gets too dry, add a tablespoon or splash of water--not too much or you'll have watery vegetables.
  8. Add a pinch or two of salt to bring out the flavour and voila!


Hello tasty!

It's my first time having them so here's my verdict... they're really tasty and quick to make! They are tougher than spinach and taste a little bitter (but I love bitter melon--those who don't know... you're in for a treat ha ha!) but still taste great.

Maybe you might have the opportunity to try this recipe or check online for other ways to use this wonderful forgotten gem!!

Tuesday, September 22, 2015

Lesson #208 & #209: Frustrated Enough to Motivate

I haven't written about the last two lessons because nothing has really progressed and there hasn't been any "a-ha" moments either. I am working on jumping courses again but I'm finding myself struggling with my position over jumps, again. While it isn't a big deal... I've been doing courses at a lower height so I feel like I've regressed a bit. It's more injury to the ego than actual regression so I'll take it... for now.

I have been anticipating the jumps recently and I notice that's what's keeping me behind and a poor position. I suspect it's got to do with Ariel's recent stint of counter bending and giving me way more trouble in the arena than I'd like. I haven't let it escalate and she hasn't dragged me out of the arena on her whim, but I'd still like to get that respect back. As well, I seem to have trouble keeping our corners deep. This causes a poor set up usually and it is yet another cause to the issue over fences.

The flat work is mostly fine (it can always be better) but I have had trouble getting Ariel to respect my aids. I might have to resort to crops/bats and spurs again... which I don't really enjoy using but if Ariel is getting a bit sour with poor communication from her rider, I wouldn't be surprised if that's the reasons she's reacting the way she is. I don't blame her either... having clarity during a conversation about what to do is awfully important in my books.

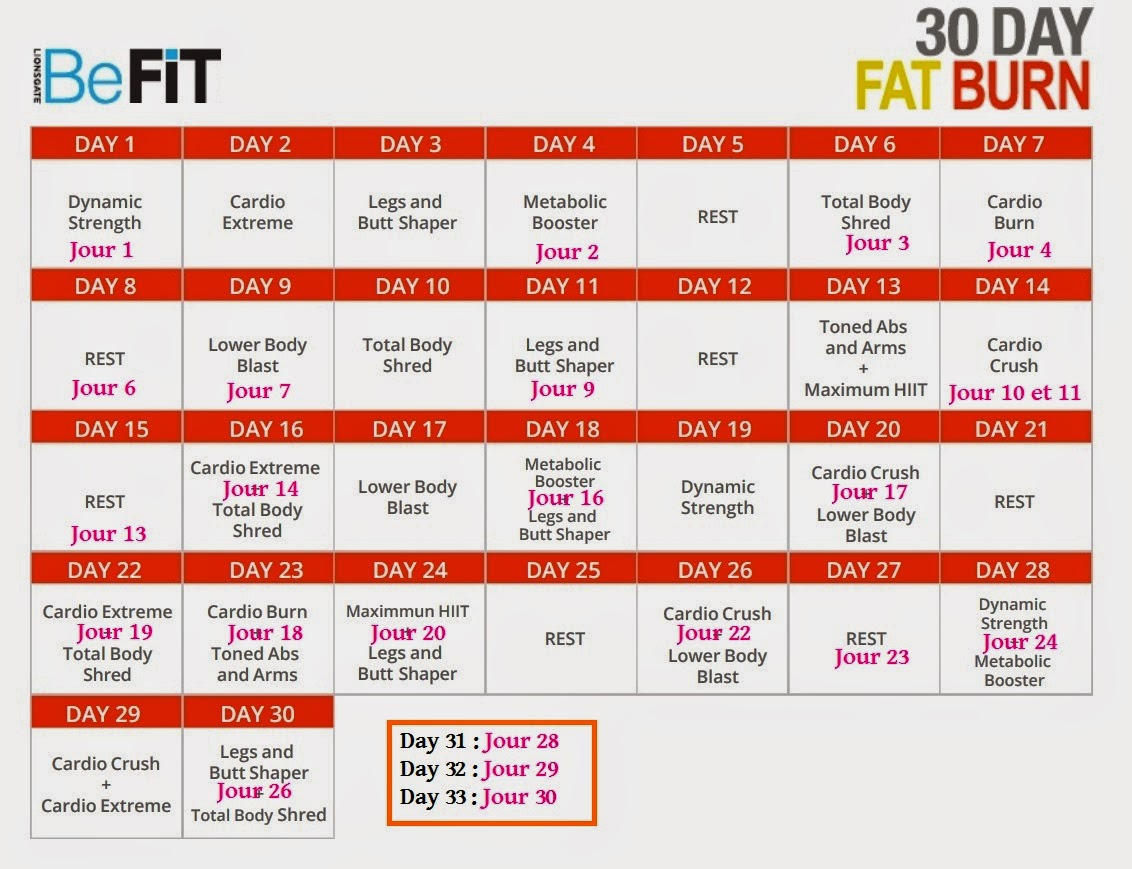
As with all things to do with riding, it starts with the rider and I have been talking my mouth off on this area periodically for some time. I make excuses all the time but in order to get over my rut (both in riding and other areas), I will incorporate a balanced schedule and include other physical activities. Upon further reflection and not enough research, I started the BeFit's 30 Day Fat Burn workout that ScarletPen28 has done. Each video is approximately 10 minutes.

Click to enlarge

Scarlet did this one and another combined; she's crazy. I can only manage this one right now... after doing day 1, I still can't feel my legs and part of my arse. I'm not sure whether to love or hate her for finding this thing. Tonight, I attempt the Cardio Extreme workout. If you don't see another post in the next few days, know that I probably didn't survive that video (10 minutes!! :O) and that +ADW found me curled up in the fetal position in the basement.

Wednesday, September 16, 2015

A Review: Tredstep Ireland; Deluxe Half Chap (brown leather)

When I started riding, I did as most parents do with their kids and didn't spend a lot of money on most of the equipment needed. I wasn't sure how long I'd be riding and wanted to be certain I was fully committed to a rather expensive sport. I did splurge a bit with my first pair of half chaps because they were on sale, hoping that they would last a long time... and got the leather half chaps from Greenhawk. I used these for ~3 years before they finally gave way. +Laura does a thorough review of the same half chaps in 2012 and we both ended up with the same issue where the zipper gave out before the actual body of the half chap.

I have brown paddock boots and interestingly, while I was looking for them, it seems like brown is out now so I had difficulty locating brown half chaps. I settled on Tredstep.

Mine are in brown but brown is apparently out of style!??

What drew me to these ones were that they are a soft durable full-grain leather that is easy to clean. I only school so I have no need to get fancy but I do want to look presentable during lessons and an easy clean means that I can do that without different cremes or whatnot. I wipe clean with a damp cloth and then I'm on my way.

While shopping for these, I found that Tredstep carries a very wide range of sizing as you need to size the widest part of your calf as well as the length of your lower leg--I am short and wide-ish. In addition to the range of sizing available, the back panel of the chap is stretchy and conforms to the leg comfortably and quickly. This meant minimum break in time after I bought them as tight as humanly possible while still being able to zip them. The two snaps: top and bottom also meant that the chaps stay in place snugly while I'm moving.

And of course, the best feature is the zipper. It's practically industrial grade and I don't worry about the zipper coming apart or the tag breaking. Though, in time, I'll be able to make the best assessment of that! For now, this chap has exceeded my expectations and they also look great. They are expensive, relative to what I had, but when compared to the other brands I checked out, a full-grain leather half chap is around this price range.

I'd say that these are great for adult riders like myself who are serious about riding long term (aren't showing) and are looking for a sleek looking half chap that is built to last.

Disclaimer: I wasn't solicited by either the tack store or Tredstep to review this half chap. I bought it after reviewing some of the others out there and decided upon this pair and this post is simply my opinion based on experience.

Monday, September 14, 2015

Lessons #205, #206, #207: Reinvigorating Goals and Direction

There isn't much to write about with the last few lessons other then I've been working on addressing the right side issue that we discovered 2 weeks back. I try to ride with my right hip relaxes and the leg "falling outwards" so I can keep that in check. It seems that once that hip pulls my right leg in, the rest of my right side follows and that's where the curling inwards comes from. So my lessons are mostly me making the conscious effort to go through the check list at all gaits:

  1. Weight in the heels/heels down
  2. Right hip open and relaxed so the thigh is off the saddle
  3. Hips and lower back relaxed to absorb the movement
  4. Chest open and shoulders back and 'down'
  5. Looking in the direction I am turning, even for corners
  6. Shoulders following my head turn
  7. Sitting back/up
Things are coming together more as I am making the conscious effort to ensure that the hip doesn't allow my right leg to collapse. It's really easy to get handsy in the corners instead of using my seat to push Ariel back out and on the right bend.

On Thursday, there were 2 other students in my class and one of them is still working up to getting comfortable with things so it was a good opportunity to focus on flat work. I felt ambitious (though to be honest, I did tell myself I needed to use the time more efficiently) and started weaving in and out of the bending poles that were just standards set in a line. This exercise is difficult even at the walk because you want to use your seat to turn them and not your hands/reins. 

The warm-up consisted of a series of different tasks that for some reason, I felt very comfortable flowing from one to the next...
  • Posting trot with and without stirrups
  • Sitting trot with and without stirrups
  • Adding 2 point position
  • Cantering with and without stirrups
  • Cantering in a 2 point position
  • I even managed to sort myself out to pick up and drop stirrups during canter! A feat that usually leaves me tight and bouncy
On Sunday, I had +ADW pick what we'd do since I usually get to pick on Thursday nights already and I wasn't feeling particularly nervous about anything. I'm glad the picked an over fences lesson because I had done quite a few flat classes recently. We did things pretty low key and kept the jumps low so to get a better feel of the horses' movement over jumps. The lesson went quite well in that we were jumping the course and ended on the highest jump that was set out there at around 2'3" to 2'6". It wasn't pretty which simply means I need to continue working up on the things that I am doing at the lower heights so I am more solid.

Areas of improvement include, but are not limited to:
  • Sitting back up between jumps
  • Shift our hips back instead of jumping with the horse, over jumps
  • Using the space in the arena better so we can appropriately set ourselves up for the jumps
  • Looking early for the jump
  • Drive with our butts coming into the jump
Hopefully I'll be as diligent with my most recent lessons, for the coming ones so I can continue to improve upon the things I lack. In addition, I am going to be starting ScarletPen's 30 day bottom challenge to address a possible weak backside and start getting in a 45-60 minute yoga session 2-3 times a week. And now that the weather is cooled down, it might not be a bad idea to jump on my bike...

Friday, September 4, 2015

Lesson #204: Quasimodo

The traffic I deal with on week nights really makes me question why I go up in the evenings... especially since right now, I don't work. It took me 30 minutes more than usual, to get up last night. I left early with the hopes that I would have some time to mosey on in. I was SO WRONG. I was even late this time and had to run out into the rain to get a sopping wet Ariel from her paddock and quickly tack up.

Another new student joins the class today. This girl looks to be in her teens and she's returning to lessons after taking time away from riding. That said, I figure it's going to be a pretty low key lesson so I can work on my canter transitions.

After a varying warm-up of posting trot, sitting trot with and without stirrups, I am directed into the canter. The other girl seems to pick it right back up and has no problems at all. I, on the other hand, am struggling with keeping Ariel out at the rail on the right rein and she's falling in and the corners are just plain ol' botched up. I am certain that it has to do with me because as is most of the time, it's a poor rider that gives poor results. Especially with a horse like Ariel who is not particularly forgiving about miscommunication from the rider. While Ariel knows her job and loves to jump (she hates to bend... haha), she demands that her rider is properly clear with her so that she too so that everything flows. After all, the communication means that the rider is giving appropriate physical signals and staying balanced.

It's pointed out I'm using too much rein with the outside one trying to redirect her. Sheri directs me to break down the canter in the arena: trot the long sides and canter going into the corners. Then progressively going into the opposite pattern. The departs and downward transitions are bang on and there is mostly no issues when I'm doing the canter in pieces. It is pointed out to me though, that the cause of the falling in/bad corners is my right side curling in at the corners (I KNOW!!! UGH) and my right leg gripping and coming out of the seat. Seriously, the left side is perfectly fine and that's how my right side should be but isn't. I don't know the cause but I do have to take extra care to keep my chest open and right leg relaxed as much as possible.

I swear I was so frustrated but equally relieved I figured out what the issue is. So now comes the work each and every minute of every single lesson following....